(651) 239 - 2472
REMastered Sleep
About the Company
REMastered Sleep is a company that creates therapy water bottles for users with a variety of conditions, but their main focus is on user's with sleep apnea. Their specialized straw forces user's to exercise their soft pallet and tongue in certain ways to prevent the tongue from falling back into the throat while the user sleeps. Over time, this reduces the symptoms of sleep apnea.
Sebastian and his group were tasked with diagnosing and remedying issues with REMastered Sleep's Steel Kit. This kit included an outsourced water bottle and the therapy straw.

Identifying The Problems
Before the design process, it was important for us to understand the issue with the current design. After looking through the product reviews on the company website and speaking with the CEO of REMastered Sleep, the following issues were noted:
The product does not feel "whole" since the water bottle and straw appear as separate items with no connection.
Because the straw is not connected, it rattles around in the bottle.
If the bottle is left open on a desk (a common case for users), the bottle can possibly tip and spill water.
In response to these issues and after speaking to the CEO on changes he was willing to make, it was identified that an attachment to the water bottle would be the best course of action as existing products would not have to be changed.
Initial Design
We came up with the idea for a silicon stopper attachment for the water bottle which would hold the straw in place (to prevent rattling) and also be wedged in such that the top of the water bottle would not spill water when tipped over. This addition would help unite the two products together and make the entire set feel more cohesive as well.
The design idea came from the hourglass shape of the bottleneck. The idea was that the attachment would fit snuggly in the neck of the bottle and not be able to fall past the next because of the shape. The bottom part of the attachment would be hollowed such that half of the attachment could fold and fit into the narrow part of the bottle, but the other half could not.

Second Design
After receiving the water bottles in person, we realized that the inside of the water bottle does not follow the hourglass shape, so our design would not work.
In a redesign, we focused on a way to hold the attachment up by connecting it to a divot in the straw.
We came up with three attachment designs for the bottle which were numbered for clarity in further steps.
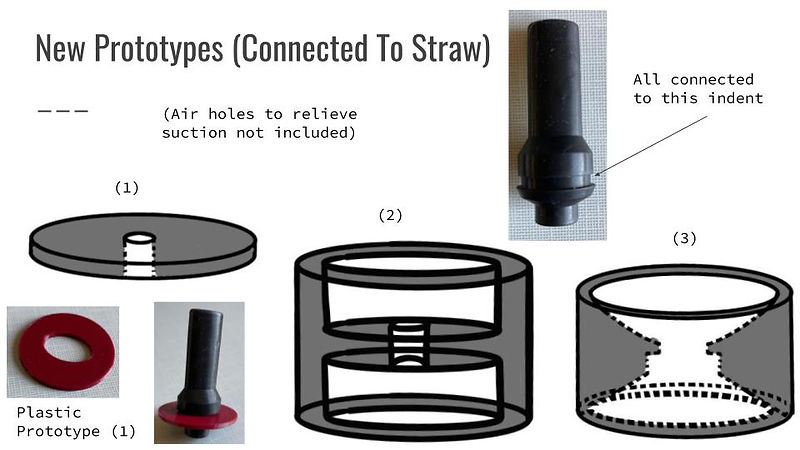
3D Model of Second Design
Once the initial blueprints were designed. I used Blender (a free 3D modeling software) to create mockups of the designs.

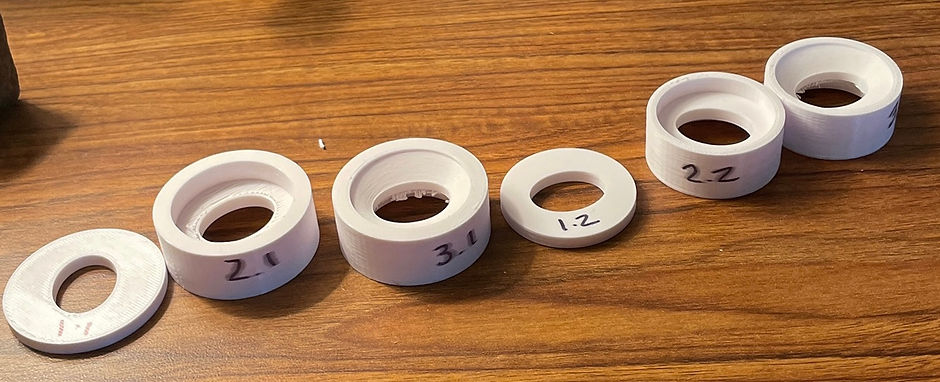
3D Printing of Second Design
The blender files were exported as .stl files and inputted into PrusaSlicer (a free 3D slicing app for the 3D printers in at the UMN). We then 3D printed hard plastic versions of our models. Through this process, minor issues were identified and corrected. These included issues with size and shape. These issues were remedied in future 3D prints (not shown). Through 3D printing, it was identified that design #2 was the most feasible project as it combined the structural integrity of design #3 and the simplicity of design #1.
3D Mold Design Process
Once design #2 was identified as the design we were going to continue with, we began the process of preparing to cast the mold in Platinum Grade Silicon. Our plan was to create 3D printed molds and then pour silicon into the molds, then allow it to cure overnight.
The main challenges of the mold design process were to:
create a mold that preserves the shape of the initial design
create a mold that is easily 3D printable (reduces the use of scaffolding in the 3D print)
create a mold that is reusable (mold does not get destroyed when silicon is removed)

3D Mold Designs
Following the action statements previously addressed and an ideation process, two main designs emerged.
The first design was by far the simplest design and it was also incredibly feasible to 3D print. The issues with the design were apparent even in the ideation phase: it would need to be destroyed in order for the silicon product to be released, it distorts the shape of the initial design by removing the lower portion of the outer wall.
The second design was beneficial in that it did not face the issues of the first design: it does not distort the shape of the initial design, and it was made in two separate pieces that could be separated so the mold would not need to be destroyed after each use. However, there were some interesting challenges that were identified in the ideation phase. First, because the silicon would be almost entirely surrounded by the mold, we would be unable to visually identify if the silicon had sunk fully into the mold and we would not be able to visually check for bubbles in the liquid silicon. Second, there is the possibility that not all bubbles would rise out of the silicon in the vacuum chamber since the top is partially covered.
Because this was our first-time silicon casting and our perceived issues were only hypothesized, we continued on to a silicon cast with the two designs, despite understanding potential issues.

Silicon Casting
We then traveled to Anderson Laboratory to silicone cast the molds. We used a vacuum chamber in order to reduce any air bubbles in the final product.

Final Product Review and Animation
After fixing our mold and recasting from silicon. We arrived at a final product.
We found that this silicone attachment reduced the rattling of the straw in the bottle, kept water from leaking when the bottle is turned upside down, and made the straw feel more connected to the water bottle.
In addition to a presentation to showcase our new project, we also created a 3D animation of what we made. This was a relatively quick process since our models were already put into Blender (an animation software).
Silicone Cast Review
We learned a lot from our first attempt at casting. First, we identified that the Full Mold (1) would not likely be viable for our product. The issues that we foresaw with the mold came to fruition. It did not produce a mold that perfectly matched our product design and the mold had to be destroyed in order to reach get the product out.
The two-part mold seemed much more viable, however, we did encounter some issues with it. Specifically, we found the holes in the mold that were created to pour in the silicone to be too small, this resulted in the casting process being messy. We also found that the final product had walls that were too thin. This caused the final product to be too soft.
In order to solve these two issues, the final mold model was created with larger input holes and with thicker walls. This produced our final product.

